


-OR-
"Everything you always wanted to ask about the 1959-1963 Cessna 150's but were afraid (or didn't know) to ask."
Well...... not quite everything, but a lot of info and photos.
And a Bunch of Stuff that Later 150 and 152 Owners can find Useful Too!
Email me at hannacm@charter.net
150 home / Charles's Home / Misc Items / MLG Insp / Firewall / Rudder & Vertical / Tailcone / O-200 / O-200 Oil Flow / Props / Jacking / Shoulder Harness / Links / Owner Mfg Parts / Owner Maintenance / IO-240 Dream Engine
Legal stuff: The material presented below is for educational/entertainment/reference use only and should not be used as documentation in the inspection and repair of any aircraft. You should always consult the Manufacturers FAA/CAA approved documentation such as Maintenance Manuals, Service Letters and Bulletins, Kit instructions, STC's, etc. for inspection and repair information and procedures. I make no claim or warranty as to the accuracy or completeness of the material presented, and accept no responsibility for its use or misuse. Also, this web page or any other of mine, is not connected with, or approved or sanctioned by Cessna Aircraft Corp. or any other entity named herein. Charles M. Hanna
Follow these links to the various topics. I have compressed the photos but it may still take some time to load a page.
Rudder and Vertical Fin Inspection
Tailcone and Horizontal Stabilizer attachment Inspection
Firewall Inspection This page uses thumbnails you can click on for the larger view of each image.
TCM O-200 A Inspection and tips
TCM O-200A Internal Oil Flow photographs and discussion
A few pics of the Teledyne Continental IO-240 engine
Propellers and Spinners for the "early" 150's (prior to the "L" models)
Jacking Tools and Procedures for the Cessna 150 (in work and not complete)
Changing a main tire, photo series, in work
Shoulder harness installation information (sorry, in work and just a couple of links and the FAA policy letter for now, but still very useful)
Miscellaneous Items and Quirks of the Early 150's
Aviation Links (FAA, FAR's, AD's, NPRM's, aircraft manufacturers, type clubs, parts suppliers, etc)
Here are two articles by FAA inspector Bill O'Brien related to owner performed maintenance and owner produced parts. Follow the links below to see them and use your browsers back button to return to this page. Good information for the non-A&P aircraft owner.
O'Brien on owner performed preventative maintenance
O'Brien on owner produced/manufactured parts
Another article on owner
produced parts, this one by Don Dodge, of the South Carolina FSDO as
published in FAAviation News,
July/August 2002 edition.
While the intent of this web site is the early 150 models, much of the information is applicable to later aircraft, so don't go away if yours is not an early model, you probably will find lots of useful information here.
First, some year/model/serial number info.
| 1959 | 150 (no letter) | 17001 to 17683 |
| 1960 | 150 (no letter) | 17684 to 17999 and 59001 to 59018 |
| 1961 | 150A | 15059019 to 15059350 |
| 1962 | 150B | 15059019 to 15059350 |
| 1963 | 150C | 15059701 to 15060087 |
| 1964 | 150D | 15060088 to 15060772 also 644 |
| 1965 | 150E | 15060773 to 15061532 |
One thing which everyone will find confusing is Cessna's numbering and naming system for bulletins. At one time the numbering system was a model, such as 150, followed by a hyphen and another number which is a sequence number. This became a problem as information many times affected more than one model of aircraft and searching 150 bulletins does not turn up all information pertaining to 150's, one must go look in 175, 172 and such bulletins. Cessna later came out with a new numbering system using the year, ie. 65 followed by a hyphen and a sequence number. Cessna also called its letters Service News Letters for a while, then just plain Service Letters. More recently they have called the letters SE and ME for single engine and multi-engine, except that the Skymasters are included in the Single Engine catagory. Confusing to say the least.
TYPE CERTIFICATE INFORMATION FOR THE 150 AND 152
View the FAA Type Certificate Data Sheet (TCDS) 3A19 for all Cessna 150 and 152 products, Requires Adobe Acrobat. This copy of the PDF file loads from my web site, if you prefer to have it load from the FAA's web site, CLICK HERE and you will be taken to a web page at the FAA's web site.
For the Reims Aviation manufactured 150 and 152 products the type certificate is A13EU and can be viewed HERE (loaded from my web site) or HERE (and you get a page from the FAA web site).
View the FAA Type Certificate Data Sheet (TCDS) E-252 for the Teledyne Continental Motors C-90 and O-200 model engines. This copy is loaded from my web site, if you prefer to have it load from the FAA's web site, CLICK HERE and you will be taken to a web page at the FAA's web site.
View the FAA Type Certificate Data Sheet (TCDS) P-904 for the Sensenich 69CK propeller (this is a Adobe PDF file that loads from my web site) or from the FAA's web site.
View the FAA Type Certificate Data Sheet (TCDS) P-918 for the McCauley Met-L-Prop series models 1A100/MCM, 1A101DCM and others (this is a Adobe PDF file that loads from my web site) or from the FAA's web site.
To appease you 152 owners who are looking for a little information on your aircraft, here is the Type Certificate Data Sheets (TCDS) for the Lycoming O-235 series and the McCauley 1A103 "gullwing" prop. From this web site...Lycoming O-235 and the McCauley 1A103 propeller. From the FAA's web site, you get the same information for the O-235 and the McCauley 1A103 propeller.
IFR with a GPS? If you need to know what is necessary, unit certification requirements, and other need to know information, you should have a copy of Advisory Circular 90-94
GUIDELINES FOR USING GLOBAL POSITIONING SYSTEM EQUIPMENT FOR IFR ENROUTE AND TERMINAL OPERATIONS AND FOR NONPRECISION INSTRUMENT APPROACHES IN THE U.S. NATIONAL AIRSPACE SYSTEM, Date: 12/14/94.
Download it from the FAA's web site. WARNING, this is a 5.3 meg download and will take severall minutes even with a cable or DSL modem. Allow as much as a couple of hours for a regular telephone modem.
If you are interested in learning more about your Cessna 150 or 152, as an owner or pilot, from a mechanical or operational standpoint, there are a couple of different discussion groups on the web you should consider participating in.
The Cessna 150-152 Club has a forum which you can join, which is divided into different topics of discussion such as Technical matters, Piloting, the Club's 2004 national fly in at Clinton, Iowa, and a Everything else category. The forum runs on the very user friendly UBBThreads software and I highly encourage you to participate. Go to http://www.cessna150-152.com/ubbthreads/logout.php to register.
The Cessna 150_152 discussion group (no longer related to the Club), is found on Yahoo Groups. You do not have to be a Cessna 150-152 Club member to participate and the official club discussion group has moved to its own server Just follow to the link below for more information, or to see what is happening, follow the link below directly to the threads. We'd love to hear from you. Click here to go to the homepage at Yahoo. It is necessary to join Yahoo Groups to participate, however this is a formality.
Some advertising for products you can use!
Some very good, long time, friends of mine, Rick and Judy Skrzypkowski have a home business. They are making name badges, bag tags, engraved plastic signs, trophies, etc. The bag tags are not some cheesy thin stuff but rather a real thick, fiberglass reinforced plastic that can withstand the roughest bag handlers. He can print your own photograph on the tag and then put your name and address, or whatever you want on the other side, they look real neat and everyone with a Cessna 150 needs a pic of their own airplane on a bag tag. They also do name badges and I think they can with a little effort overlay your name, etc., on the pic and print it on a badge, just the thing for Clinton or Oshkosh.
|
|
|
|
|
|
|
|
Please visit Twin Oaks Imaging at www.twinoaks.biz for their line of products, they will appreciate the business
For Sale................
Sold the wingtips, but I've got a couple of other items I need to move, so keep checking back!
Need to move an airplane by trailer? A friend of mine sent me this pic when he took the wings off his Ercoupe and trailered it to have work done on the wings and an annual and reassembly done away from homebase.
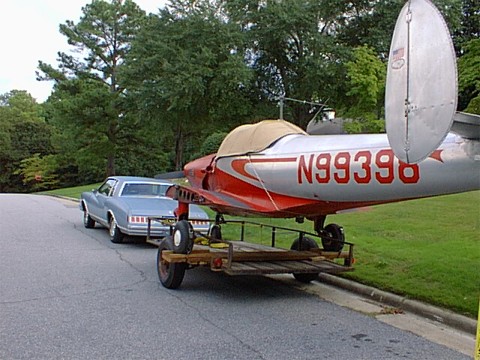
Few trailers are wide enough for a coupe or a 150 for that matter. even flatbeds like you'ed haul the farm tractor on are too narrow. What my friend did was go to a building wrecking company that has a "junkyard" of salvaged building parts and found this "timber". Its rough cut wood, possibly a hundred years old, and is about 3 inches thick and about 12 inches wide. He nailed some 2x4 "chocks" to it and in this case slid it thru the trailer. Then they hefted the coupe onto it. I have used this same board on a flatbed that you haul a tractor on. Nailed it down and walked my 150 fuselage up onto the trailer by the nose gear and steadying the mains till we reached the board.
I have also seen this board used on top of a U-haul trailer, the one with 2 ft high metal sides and tubular rails above the sides. Same thing, they hefted the coupe into place and used another board for the nosegear.
I use the ratcheting type nylon straps to restrain stuff like this. You can get it tight and if need be, its easy to cinch up some more down the road if things settle and the straps get loose. The money spent on the straps is well worth it, no headaches and no damaged parts. One lesson I learned long ago, when you use ratchet straps or anything like that, always put the ratchet on the Right side of the truck, trailer or whatever. That way, when you stop alongside the highway to tighten them up. you will be out of the traffic while doing so. One word of caution with these ratchet straps, always close the lever down in the fully latched position, this locks the mechanism by bringing a couple of pawls on the handle behind the slide bar that catches the ratchet teeth, and if you do not, it can unlatch itself.