Email me at hannacm@charter.net
Visit Charles' and Dusty's Homepage
Return to the Early Cessna 150 Inspection Homepage
150 home / Charles's Home / Misc Items / MLG Insp / Firewall / Rudder & Vertical / Tailcone / O-200 / O-200 Oil Flow / Props / Jacking / Shoulder Harness / Links / Owner Mfg Parts / Owner Maintenance / IO-240 Dream Engine
Miscellaneous Items and Quirks of the Early 150's
Legal stuff: The material presented below is for educational/entertainment/reference use only and should not be used as documentation in the inspection and repair of any aircraft. You should always consult the Manufacturers FAA/CAA approved documentation such as Maintenance Manuals, Service Letters and Bulletins, Kit instructions, STC's, etc. for inspection and repair information and procedures. I make no claim or warranty as to the accuracy or completeness of the material presented, and accept no responsibility for its use or misuse. Also, this web page or any other of mine, is not connected with, or approved or sanctioned by Cessna Aircraft Corp. or any other entity named herein. Charles M. Hanna
First off let me state that I have not reproduced any Service Letters on this web page. For years Cessna's documentation was not copyrighted, then around 1980 they got into a tiff with Aircraft Technical Publishers (ATP) who were reproducing the SL's and Cessna's lawyers feared liability problems from uncontrolled distribution, so they copyrighted everything they had ever published. I'm not sure of the legality of this as it was already in the public domain, however ATP came to some sort of agreement with Cessna. Sometime later it was apparently decided that indeed the previously un-copyrighted documents were in the public domain. As an aircraft owner you should have access to all the necessary documents to own, operate, and maintain your aircraft. I highly recommend the CD's published by McCurtain Technology Group. They publish a maintenance manual CD, an Illustrated Parts Catalog CD and a CD containing all the Cessna Service Letters and Bulletins and also many of the service kit and accessory kit instructions. They are reasonably priced and you have no reason to not own them. If you prefer printed manuals, there are several sources, such as Essco, and of course, manuals can nearly always be found for sale on Ebay.
For starters, I'll start with some early Service Letters and information which the Early 150 owner will find useful.
Service Letters, Bulletins, and such.
SNL 150-4, dated 03/27/59, Advises that on '59 models, prior to s/n 17250 the tachometer drive cable was routed thru a hole in the firewall outboard of the oil temperature tube. Beginning with s/n 17250 the tachometer cable was routed in the inboard hole and the oil temp line routed thru the outboard hole. The SNL advises that this should be done on s/n's 17001 thru 17249 to relieve "considerable tension" on the tach drive cable and help prevent tach cable breakage.
*** *** ***
SL150-14, dated 01/19/60, Advises that on '59 models prior to s/n 17590 the tailcone attachment at station 173.41 was made with AN470-AD3 rivets (3/32 inch diameter). At s/n 17590 the factory began using AN470-AD4 rivets (1/8 inch diameter). The Service Letter goes on to "recommend" that the aircraft with 3/32 rivets have them replaced with 1/8 inch rivets. This should be done by drilling out every other existing 3/32 rivet and driving new 1/8 rivets first then drilling out the remainder and driving them. The bulletin advises that there are 31 rivets to replace and that the two rivets under the dorsal do not need to be replaced.
I suspect that most aircraft have already been modified but it is certainly worth checking out, especially on a prebuy as it will take two mechanics most of a day to do this, due to the difficulty of access inside the tailcone this far aft.
*** *** ***
SL175-25, dated 11-15-60, is applicable to 150's prior to s/n 15059079 and calls for modifying the Cutler-Hammer master relay by drilling three drain holes in the bakelite contact cover on the bottom of the relay. (arcing electrical contactors create moisture and it had no way to drain out). This is an example of what I mentioned about Service Letters for other models being applicable to the 150. The SL has a drawing showing the three holes to be drilled, all no.30 drill size, one dead center in the cap, and two more on either side of center, .63"(center to center) from the center hole, (which is 1.25" center to center from the hole on the opposite side, all three holes aligned along a line running the center of the cap the longest way. You must, of course remove the cover prior to drilling the holes, and you should obtain a copy of the SL for your own records prior to performing this modification.
*** *** ***
SL62-8 calls for the installation of a silicone diode across the two smaller control terminals of the Cutler-Hammer master relay. The diode is p/n 0770657-1 and is intended to short out electrical spikes in the system when you turn off the master switch. This is only for aircraft s/n15059503 and prior, later aircraft were equipped at the factory with this diode.
*** *** ***
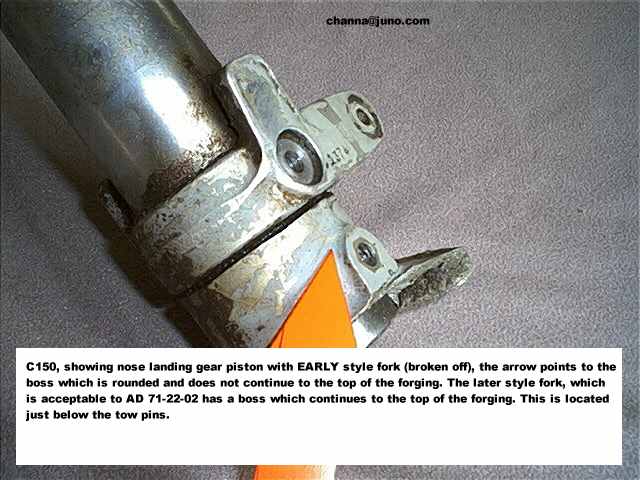
SL150-5 calls for the installation of two 1/8 x 5/8" long roll pins in the nose gear fork. Due to AD71-22-02, the nose gear fork should have been changed and the new fork is drilled for the roll pins. There are two small holes directly above the axle thru bolt. If you do not have them, and the ferrules (or cups) on the axle outside of the bearing do not have small notches cut or filed in them to accept the roll pins, you should do this as it keeps the ferrules from spinning with the bearing and damaging the fork, axle bolt, and axle tube.
If you care to inspect for installation of the proper fork, look for the raised boss that the bolt JUST BELOW the tow pins, protrudes from. If the raised boss extends all the way up to the top of the fork forging and is machined off flat, then it is the new type. If it stops short of the top of the forging and is rounded on top, it is the old style and must be replaced prior to further flight, as the deadline on the AD expired long ago.
***
SL 64-58 calls for the installation of a new style nutplate on the center seat belt bracket, forward bolt. This is only for aircraft s/n 15060772 and prior, later aircraft are equipped from the factory with the new nutplate. The new type nutplate is a p/n 22NA1-02 and looks like a standard AN365 elastic lock nut with nutplate attachment wings on it. The defective nutplate is very thin in the threaded area with a mushroom type head in the elastic locking area. While this may seem trivial it is a safety item.

***
SL65-72 dated 07-27-65, discusses the new and improved mufflers and a change in the cabin heat hose routing. The new style mufflers have a wraparound shroud that screws to itself. The earlier design, which was much more prone to cracking had a shroud that wrapped about 80% of the way around and secured to a plate welded to the muffler. The older mufflers are most easily identified to the uninitiated as having both cylinder risers separate from the muffler and attached to it by half shell clamps. The new style mufflers have one riser attached to the muffler with the half shell clamps and the other one is a welded part of the muffler with no clamps. The biggie to this SL is the swapping of the hoses. The cabin heater MUST be supplied with heated air from the LEFT muffler, and the carb heat supplied by the RIGHT muffler. This is mandated by AD 67-03-01 and full compliance with SL65-72 is terminating action for the AD.
***
SL 65-41, dated 04/16/65, item #4, states:
"The question has been asked as to installation of Cessna-Crafted wheels and brakes on earlier single engine models which are equipped with Goodyear type wheels and brakes.
Cessna-Crafted wheels and brakes can be retrofitted on all earlier models. Interchangeability is covered in the applicable Parts Catalog.
A log book entry, referencing this Service Letter is the only certification approval necessary."
To the unknowing, "Cessna-Crafted" at the time this SL was written meant Cleveland Products Co. wheels and brakes. It was not until the 1970's that Cessna began manufacturing their own wheels and brakes under the McCauley brand name. Cleveland has made STC'ed conversion kits for virtually every model Cessna equipped with Goodyears, except the 150. The early 150's were equipped with 5.00x5 main and nose wheels, and the original Goodyear units were terrible. They used TUBELESS tires which inflated thru a sidewall valve using a needle, like a basketball, and they use a unusual bearing with a seal made onto it, and a wide race for the seal to run on. Goodyear later came out with a letter detailing the conversion of the wheels to tube type by drilling a hole in the outer wheel half for the valve stem. The brakes use a fixed puck and a floating disk, and "anti-rattle" clips to keep the disk square in the rim. The linings are about the size of a quarter and very expensive, and ineffective.
If a 150 is equipped with 5.00x5 main wheel/tires, it has a spindle (axle) that is smaller than that required for 6.00x6 wheels. As 6.00x6 wheels were not fitted to 150's prior to s/n 15059701 (the first 150C, 1963 model) it is not legal, though possible to fit the proper axle and install 6.00x6 wheels on earlier aircraft. Cessna switched to Cleveland Products wheels and brakes (5.00x5) beginning with s/n 15059119 (a midyear 1961 150A).
If you are interested in installing Cleveland Wheels and Brakes, 5.00x5, on an early 150 equipped with Goodyears, you will need the following:
2 ea. Cleveland
# 40-78 wheel assemblies or later
2 ea.
Cleveland # 30-9 brake assemblies or later
2 ea.
Cessna S1167-4-0100 hose assemblies (these are FLOATING pucks and really
need flex hoses)
2 ea.
AN815-4D unions
2 ea.
AN822-4D elbows
2 ea.
AN818-4D nuts ("B" nuts for cutting off your existing tubes near the step
and flaring the tube for the union to attach)
2 ea.
AN819-4D sleeves (used with the "B" nuts above)
You will also need new attaching bolts and nuts but I do not know the length (this is dependent on the shimming you have between the axle and the gear leg). AN4-20A bolts should give you a good start.
***
Quirks of the early 150's
(or a rambling dissertation based on
my personal experiences of the past 20+ years of owning a '59 model and
working on others)
The 1959 and '60 models had a landing gear leg that sweeps forward a considerable amount. As a result the airplane tends to sit tail heavy on the landing gear and when loaded with fuel and baggage, and prior to the pilot and passenger boarding, the aircraft may even sit on its tail. Once started a slight blast from the engine will raise the tail, much to the dismay on onlookers who are sure you are taxiing out to take off on your last flight. In fact this is normal and provided you have properly checked your CG and max weight, and found them to be within limits, it should be of no real concern.
Due to the fact that that the airplane does sit tail low to the ground in a 3 point attitude, I have found from personal experience that you should not attempt to land with less than 30 degrees of flaps as there is a good possibility of dragging the tail and damaging the tie-down ring and tail cone.
Something else I have discovered about these models is that the Maintenance Manual recommended nose strut pressure of 30psi is way too much. At 30psi an empty aircraft will have a fully extended and locked strut. In reality the strut needs about 10-15 psi to sit at the correct height and still provide lots of "cushion" before the nose strut fully compresses. You cannot set the pressure with a gage as merely checking the pressure will let out too much pressure and the strut will be too low. Overfill the strut with dry nitrogen and one little spurt at a time, let out the pressure, each time pulling down on the prop hub and kicking the nose tire to compress the strut, then release the airplane gently and see where it sits, and repeat the process until you have achieved the desired attitude. This requires a little finesse that comes with time and experience.
About the strut, do you, or your mechanic actually know the best way to service the strut? Many do not. The maintenance manuals tell you to collapse the strut and then fill it with fluid. They offer no hint of how to get fluid into, and air out of the same little hole at the same time and have the strut full of fluid. If you do not get the strut completely full of fluid it will be spongy. What follows is a very good way of accomplishing what the maintenance manual wants you to do, and assures you that the strut is completely full of red strut fluid.
First: weight the tail of
the aircraft to the ground with a couple of sandbags placed directly on
the horizontal stabilizer spar at the fuselage.
Second: using a tire valve
tool, loosen the Schrader valve core and release the pressure in the strut,
then remove the Schrader valve core.
Third: obtain 3 to 4 ft
of clear tygon tubing, 1/4" inside diameter and force it over the threads
of the Schrader valve on the strut.
Fourth: use a gallon can
with at least 2 qts of Mil-H-5606 red hydraulic fluid it it and place it
where you can run the clear tubing to the bottom of the can.
Fifth: slowly push up on
the nose wheel, all the air in the strut will come out, bubbling out thru
the fluid in the can.
Sixth: slowly pull the strut
to full extension, allowing the suction to draw the fluid thru the tube
into the strut.
Seventh: repeat steps 5
and 6 over and over until you are not seeing any air coming thru the clear
tube when you cycle the strut in and out.
Eighth: fully compress the
strut one last time. and remove the clear tube from the Schrader valve
and allow it to drain into the can.
Ninth: reinstall the valve
core with the valve tool, and inflate the strut to 30 or so psi with dry
nitrogen. Remove the sandbags from the tail and gently lower the nose back on
the ground. The tail will stay lower than you expect since the strut is over
inflated at this point.
Tenth: using the technique
I have explained in the previous paragraph, adjust the height of the strut
to the desired level. Reinstall the valve cap.
*** *** ***
Speaking of flaps, the manual flaps are wonderful, but have a rather low max airspeed for extension. If you try to extend the flaps at the higher airspeeds allowed on a later 150 with electric flaps you will have great difficulty pulling the handle up and are exerting a great amount of strain on the pulley brackets and cables. Do not extend the flaps any at all above the white arc on the airspeed indicator.
150's are typical Cessnas, they "drive" like a truck, stiff and heavy on the controls. The earlier 150's are a little lighter, but the ailerons are especially heavy. Aileron gap seal kits are an especially good addition to these aircraft as they lighten up the ailerons and make the plane feel better to the pilot. Flap gap seals are also an especially good thing to install as they clean up the wing even more than it already is and you will see increased airspeed in cruise and a slight lowering of the stall speed.
Unless you need the STOL capabilities, I do not suggest adding the cuffed leading edges to the wings as they add a fair amount of drag. Something better for the average individual desiring to improve the low speed handling and landing characteristics of the 150 is to add the "Super Tips". Yes they are huge, a little ungainly looking on a 150 and to some are downright ugly, but they do work well, and are easy to install (and remove if a potential buyer doesn't want them). In fact what they do for the airplane is something you have to experience. I once knew a fellow who owned two identical 182's used for parachute jumping. On a lark one day he bought and brought in a set of Super Tips and asked the shop manager where I worked, to install them on one of the aircraft. Shortly after that, he bought another set as the pilots quickly discovered the difference and refused the fly the non-Super Tip airplane. *** I need to add a note here, as the folks that manufactured and marketed "Super Tips", Madras Air Service, have gone out of business. They tell me they have a couple of sets left for some Cessna models and they are not sure if the business will continue or not. You may, however, be able to locate a used set from a salvage yard or someone who does not want them and removed them, its worth the search.***
*** *** ***
Early 150's were equipped with a Sensenich Propeller as standard, a model M69CK52. This is a 69 inch diameter, 52 inch pitch (or "bite") and is the one used for book performance figures. Most 150's you see on the ramp will be equipped with a McCauley prop, of a 48 or 50 inch pitch. The McCauley has a Clark-Y airfoil and performs differently from the Sensenich. Mine has the Sensenich prop and will of course, outrun a McCauley equipped aircraft, as it has a greater pitch and a more efficient airfoil. It is slightly heavier though. Sensenich issued Service Bulletin R-16 in 1988 detailing a change in the blade loading distribution which they claim shortens time to liftoff by 9% and increases rate of climb by 15%, all the while not decreasing the cruise speed. If your Sensenich prop has an "L" after the pitch (ie. 52L, 50L, or 48L) you already have the mod. If you do not, Sensenich will alter the prop for you for about $150 plus shipping. If you need a complete overhaul plan on about $500 and shipping. The TBO on this propeller is 2000 hours, while the McCauley props have a 1000 hour TBO. Visit Sensenich for more information.
*** *** ***
As far as spinners go, for the Sensenich propeller, Cessna has had a corner on the market until now. You had a choice of a "skullcap" spinner that covered the prop bolts and the blunt front of the hub, or the large "bullet" spinner, only available from Cessna. p/n's 0450020-1 and 0450021-1 (the spinner dome and rear bulkhead) total $862.90 from Cessna!!! Along with being expensive, the spinner was notorious for cracking and breaking up quickly. It does not have a front bulkhead, except for a rivieted insert that slides into the front of the prop hub and stabilizes the dome. It still wobbles, and it "diaphgrams" fore and aft, flexing the rear bulkhead until it cracks, and also eating away at the inside of the prop hub. My personal experience with a brand new one was that it lasted 50 hours before I was forced to remove it. The bulkhead had cracked, the spinner dome cracked, and the spinner had begun to rub the prop blades where they pass thru the cutouts in the spinner dome.
As of mid October, '01, Sensenich has released an STC'ed spinner to replace the Cessna unit. It is a similar "bullet" shape of the original, doesn't block the oil cooling holes under it in the cowl, and has two bulkheads, a front one that lays flat on the front face of the prop and is retained by the prop attach bolts, and a rear bulkhead that is sandwiched between the propeller and the crankshaft flange. It is a solid design that will hold up well for a long time, and best of all, it is $395 for the entire assembly!!!
Visit http://www2.sensenich.com/direct/c2401.htm for more info, and tell Sensenich General Manager Ed Zercher that I sent you, and he will give you my special price of $395 plus shipping!
*** *** ***
A number of years ago the FAA issued an AD which reduced the timing on the O-200A magnetos from 28 degrees to 24 degrees. This caused a noticeable loss in horsepower and performance. Most engines after having this done will no longer make the minimum static RPM specified in the Type Certificate Data Sheets, which were never revised to account for this loss of horsepower. This creates a catch-22 situation where the IA performing the annual inspection finds the aircraft to be in non-compliance with the TCDS, yet it is not possible to fix the situation. Most pilots and mechanics ignore the situation.
See my TCM O-200A page for information about the remedies for this and other engine related items.
STC's, Form 337's and
Field Approvals
From a post I placed on the Cessna
150-152 discussion board on egroups.com
A FAA Form 337 is a Major Alteration or Repair Form. It is used to document major alterations or repairs done to aircraft, engines, or components. A major alteration or repair is defined in FAR part 43. The alteration or repair documented on any Form 337 must be preformed using FAA APPROVED DATA. If the work is done using data that is not FAA approved data, then the Form 337 cannot be approved or "bought off" by an IA, but instead must be approved by a maintenance inspector or other appropriate person in the FAA. (see Field Approvals below for further discussion about approved data.) This form is very useful as a properly completed one that shows aircraft and/or engine total time and weight and balance information can be very useful in the event the logbooks and records are lost or destroyed and the ships records need to be reconstructed. The FAA files a copy in the permanent records for your aircraft in Oke City, and for a small fee you can get a microfiche copy of everything in that file, that is why it is so useful, as it represents a second set of records stored in a safe place. If in doubt fill one out and submit it, it doesn't cost a dime.
An STC is a Supplemental Type Certificate, it is quite simply an amendment to the type certificate of the aircraft, engine or propeller, the amendment being done by someone other than the holder of the type certificate itself. (generally this is true, however sometimes the manufacturer also seek an STC rather than amending the type certificate in some other manner) Usually, the work being done to install whatever it is you are installing or modifying under the STC falls into the Major alteration category, or the grey area between Minor and Major. As such your mechanic must complete a Form 337 documenting the installation or modification you preformed, and have it "bought" off by an IA if he is not one himself. Note that STC's are quite specific nowadays and if says you can install a 250 horse Franklin engine in your 150A, that does not mean you can complete the installation under an STC granted specifically for a 150B, even though the aircraft is the same. Also be aware that the FAA has finally recognized the STC for what it is, the intellectual property of the creator of the modification or improvement. As such, if your neighbor modifies his 150 with aileron gap seals that are nothing more than strips of rubber glued under the hinge line between the aileron and wing, and does so using an STC'ed kit he bought, you CANNOT go out and copy the rubber strips, and photocopy the STC and instructions and do the same installation on your own 150.
This is illegal for several reasons. First, the STC you photocopied is nothing more than a license granted to a specific airplane for the work approved in the STC. Older STC's were "blanket" STC's, ie. Whelen strobe installations, if your had or bought the parts you were given free license to do the installation. This is generally no longer allowed by the FAA and virtually all new STC's and some old ones must now be single issue to a specific aircraft. Second, you fabricated parts. Generally parts, even STC'ed kits must be FAA-PMA parts (thats FAA Parts Manufacturer Approval) See FAR part 21 for a list of parts and components that do not have to have FAA-PMA. Either the Owner of the STC manufactures the parts and holds an FAA-PMA and provides the parts to you, or he purchases FAA-PMA parts from a source and provides them to you, or he specifies in the STC parts you may use, ie. a Lycoming O-320 engine, which you procure on your own, which your mechanic must determine is a legal part. Third, you violated copyright and patent laws by stealing the design and drawings, hence the intellectual property of the designer of the modification.
Please be certain that the STC you purchase may legally be installed on your aircraft, one that says "Cessna 150 series" covers all models of 150's whereas one that says "Cessna model 150" probably covers only the 1959 and 1960 model years. A number of years ago several early 150's were converted to 150 Lycomings using an STC that vaguely referred to Cessna 150's when the Feds intention was to only allow it on 150D and up aircraft (1600 lb gross). The result was AD 86-15-07 and a reissuance of that particular STC with more specific model designations.
At one time the FAA considered the stamping of the STC itself by the owner of the STC "for use only on aircraft N123XYZ" or similar as altering the document and did not allow it, forcing some STC owners to require you to sign a separate licensing agreement. Now the FAA has done a 180 turnabout and REQUIRES that this "individualizing" of the STC be done.
I must point out here that is is quite legal for the owner of an aircraft to fabricate parts for their OWN use, (but not to sell), without having an FAA-PMA. Please read FAR 21.303(b)(2). This is the same FAR that my employer uses to allow us to manufacture (mass produce) parts for the 600 airplanes in our fleet, so long as we do not violate licensing agreements we have with the aircraft and engine and component manufacturers. This is the FAR that antique aircraft restorers use to fabricate parts for aircraft they are restoring, parts which are otherwise not to be found anywhere. You do, however have to have sufficient knowledge of the part you are fabricating to copy it exactly, ie. type of metal used, thickness, etc. I have gone so far as to call Cessna and ask them to pull the drawings for a part they no longer sold, to tell me what alloy an extrusion was made of, so I could duplicate a cracked part.
Field Approvals. Everything you do to an aircraft must be done using approved data. STC's are approved data. Manufacturers Service Bulletins and Service and Accessory kit instructions are approved data if they state so in the paperwork. (older documentation may neglect to mention it, but it usually is). Structural Repair Manuals (SRM's) are approved data. Instructions for performing a repair or modification contained in an AD are approved data. Information or data that is approved by a Delegated Engineering Representative (DER) is approved data. Information contained in Advisory Circular 43.13-2A used to be accepted as approved data but it is my understanding that this is no longer accepted by the Feds. IA's please correct me on this if you have been told differently by your FSDO. If you are going to need to have a Field Approval on your work, (because you do not have any approved data to back up you modification or repair) you generally should submit a written proposal to the FSDO maintenance inspectors ahead of time and seek their opinion as to whether they will approve it when you have completed it. If you perform the alteration or repair and they won't approve it, your airplane is un-airworthy until remove or undo whatever you did to the aircraft, and they may even go so far as to issue to you a "condition notice" to document your aircraft's un-airworthy condition, in addition to the official "rejected" stamp on the 337.
If you install that 250 Franklin in your 150B, for which there is no STC, you hopefully have consulted with your local FSDO prior to beginning the mod and received their tacit approval. If so, you would complete a Form 337 documenting the modification, work being preformed as per (in this case) the STC for a different model 150, and stating that the modification is substantially similar to that approved in the STC (being specific to STC number, etc.) and the mechanic would sign the form. The IA could not approve the aircraft for return to service because there was no approved data to allow him to do so, thus the Form 337 would be submitted to the FSDO airworthiness inspector for his inspection and approval. When they sign and stamp it, it then it becomes approved data, FOR THAT SPECIFIC AIRCRAFT (make, model, serial number), and no other! That is a Field Approval, an approval by the Feds of something on which no approved data exists for that specific make, model, and serial number of aircraft, engine, propeller, or accessory.
Be aware, the FAA is not going to give you a Field Approval for a modification you created, ie. the aileron gap seals, that is substantially the same as an already approved mod, as they recognize that you have stolen the design of others. This has all come about recently as the result of decisions of courts, FAA law judges, and FAA bureaucrats.
If you install one of those Whelen Flashing beacon (not strobe) units, p/n 70509, that was the subject of discussion on egroups, you will find it is not STC'ed and thus you install it in accordance with the installation instructions, complete the Form 337 stating so, and providing sufficient data to the FSDO to prove that the beacon is of sufficient brilliance, flash rate, etc. to legally replace the Aeroflash unit, and that the part was manufactured under a FAA-PMA, and the Feds then sign and stamp it as a field approval. Previous Field Approvals on other like aircraft are good evidence to submit to the FSDO when seeking a Field Approval on your airplane.
The Form 337 link here is an Adobe Acrobat file with "fill in the blank" capability. You load the file, type in the blank spaces, and then you can print it, save it, etc. Really great, you get a professional looking completed form. Your IA may also have this capability in the IApproach software, if he is using that.
Log entries. No matter which way you go, a log entry will always be necessary. Usually my log entries read verbatim what the Form 337 says on the back. This log entry must contain the date, total time the description of the work preformed, and the signature and certificate number and type of certificate of the person performing the work.
I tell everyone this information to try and help our club members stay legal and on the good side of the FAA, their mechanic and their IA. Good and complete, well written documents also contribute to the value of your airplane at the time of sale. I could go a lot deeper if I were addressing the A&P mechanic (and many are just as uneducated about all of this as the non-mechanic owner is), but for the non-licensed owner-pilot the explanations I have given are sufficient to get you in trouble, and hopefully out of it.
Regulations concerning Pilot preformed preventative maintenance
See the following link for the complete text of FAR Part 43
Also see this link to FAA inspector
Bill O'Brien's article in AMT Magazine about owner/pilot preformed preventative
maintenance... https://150cessna.tripod.com/obrienonownermaint.html
What follows is excerpted from Part 43.
Sec. 43.3 Persons authorized
to perform maintenance, preventive maintenance,
rebuilding, and alterations.....
..... (g) The holder
of a pilot certificate issued under Part 61 may perform
preventive maintenance
on any aircraft owned or operated by that pilot which
is not used under
Part 121, 127, 129, or 135.
Sec. 43.7 Persons authorized
to approve aircraft, airframes, aircraft
engines, propellers, appliances, or component parts for return to service
after maintenance, preventive maintenance, rebuilding, or alteration.....
..... (f) A person
holding at least a private pilot certificate may approve an
aircraft for return
to service after performing preventive maintenance under
the provisions of
Sec. 43.3(g).
FAR 43, Appendix A.....
..... (c) Preventive maintenance.
Preventive maintenance is limited to the
following work, provided
it does not involve complex assembly operations:
(1) Removal,
installation, and repair of landing gear tires.
(2) Replacing
elastic shock absorber cords on landing gear.
(3) Servicing
landing gear shock struts by adding oil, air, or both.
(4) Servicing
landing gear wheel bearings, such as cleaning and greasing.
(5) Replacing
defective safety wiring or cotter keys.
(6) Lubrication
not requiring disassembly other than removal of
nonstructural items
such as cover plates, cowlings, and fairings.
(7) Making
simple fabric patches not requiring rib stitching or the removal
of structural parts
or control surfaces. In the case of balloons, the making
of small fabric repairs
to envelopes (as defined in, and in accordance with,
the balloon manufacturers'
instructions) not requiring load tape repair or
replacement.
(8) Replenishing
hydraulic fluid in the hydraulic reservoir.
(9) Refinishing
decorative coating of fuselage, balloon baskets, wings tail
group surfaces (excluding
balanced control surfaces), fairings, cowlings,
landing gear, cabin,
or cockpit interior when removal or disassembly of any
primary structure
or operating system is not required.
(10)
Applying preservative or protective material to components where no
disassembly of any
primary structure or operating system is involved and
where such coating
is not prohibited or is not contrary to good practices.
(11)
Repairing upholstery and decorative furnishings of the cabin, cockpit,
or balloon basket
interior when the repairing does not require disassembly of
any primary structure
or operating system or interfere with an operating
system or affect
the primary structure of the aircraft.
(12)
Making small simple repairs to fairings, nonstructural cover plates,
cowlings, and small
patches and reinforcements not changing the contour so as
to interfere with
proper air flow.
(13)
Replacing side windows where that work does not interfere with the
structure or any
operating system such as controls, electrical equipment,
etc.
(14)
Replacing safety belts.
(15)
Replacing seats or seat parts with replacement parts approved for the
aircraft, not involving
disassembly of any primary structure or operating
system.
(16)
Trouble shooting and repairing broken circuits in landing light wiring
circuits.
(17)
Replacing bulbs, reflectors, and lenses of position and landing
lights.
(18)
Replacing wheels and skis where no weight and balance computation is
involved.
(19)
Replacing any cowling not requiring removal of the propeller or
disconnection of
flight controls.
(20)
Replacing or cleaning spark plugs and setting of spark plug gap
clearance.
(21)
Replacing any hose connection except hydraulic connections.
(22)
Replacing prefabricated fuel lines.
(23)
Cleaning or replacing fuel and oil strainers or filter elements.
(24)
Replacing and servicing batteries.
(25)
Cleaning of balloon burner pilot and main nozzles in accordance with
the balloon manufacturer's
instructions.
(26)
Replacement or adjustment of nonstructural standard fasteners
incidental to operations.
(27)
The interchange of balloon baskets and burners on envelopes when the
basket or burner
is designated as interchangeable in the balloon type
certificate data
and the baskets and burners are specifically designed for
quick removal and
installation.
(28)
The installations of anti-misfueling devices to reduce the diameter of
fuel tank filler
openings provided the specific device has been made a part
of the aircraft type certificate data by the aircraft manufacturer, the
aircraft manufacturer
has provided FAA-approved instructions for installation
of the specific device,
and installation does not involve the disassembly of
the existing tank
filler opening.
(29)
Removing, checking, and replacing magnetic chip detectors.
(30)
The inspection and maintenance tasks prescribed and specifically
identified as preventive
maintenance in a primary category aircraft type
certificate or supplemental
type certificate holder's approved special
inspection and preventive
maintenance program when accomplished on a primary
category aircraft
provided:
(i) They
are performed by the holder of at least a private pilot
certificate issued
under part 61 who is the registered owner (including co-
owners) of the affected
aircraft and who holds a certificate of competency
for the affected
aircraft (1) issued by a school approved under Sec.
147.21(e) of this
chapter; (2) issued by the holder of the production
certificate for that
primary category aircraft that has a special training
program approved
under Sec. 21.24 of this subchapter; or (3) issued by
another entity that
has a course approved by the Administrator; and
(ii)
The inspections and maintenance tasks are performed in accordance with
instructions contained
by the special inspection and preventive maintenance
program approved
as part of the aircraft's type design or supplemental type
design.
(31)
Removing and replacing self-contained, front instrument panel-mounted
navigation and communication
devices that employ tray-mounted connectors that
connect the unit
when the unit is installed into the instrument panel,
(excluding automatic
flight control systems, transponders, and microwave
frequency distance
measuring equipment (DME)). The approved unit must be
designed to be readily
and repeatedly removed and replaced, and pertinent
instructions must
be provided. Prior to the unit's intended use, and
operational check
must be performed in accordance with the applicable
sections of part
91 of this chapter.
(32)
Updating self-contained, front instrument panel-mounted Air Traffic
Control (ATC) navigational
software data bases (excluding those of automatic
flight control systems,
transponders, and microwave frequency distance
measuring equipment
(DME)) provided no disassembly of the unit is required
and pertinent instructions
are provided. Prior to the unit's intended use, an
operational check
must be performed in accordance with applicable sections of
part 91 of this chapter.
Now that I've shown you what work you are allowed to perform on an airplane here is the section that defines the "quality" of your work by establishing "performance rules".
Sect.
43.13 Performance rules (general).
(a) Each person performing maintenance, alteration, or preventive maintenance on an aircraft, engine, propeller, or appliance shall use the methods, techniques, and practices prescribed in the current manufacturer's maintenance manual or Instructions for Continued Airworthiness prepared by its manufacturer, or other methods, techniques, and practices acceptable to the Administrator, except as noted in § 43.16. He shall use the tools, equipment, and test apparatus necessary to assure completion of the work in accordance with accepted industry practices. If special equipment or test apparatus is recommended by the manufacturer involved, he must use that equipment or apparatus or its equivalent acceptable to the Administrator.
(b) Each person maintaining or altering, or performing preventive
maintenance, shall do that work in such a manner and use materials of such a quality, that the condition of the aircraft, airframe, aircraft engine, propeller, or appliance worked on will be at least equal to its original or properly altered condition (with regard to aerodynamic function, structural strength, resistance to vibration and deterioration, and other qualities affecting airworthiness).
So, you can see from the above regulations, maintenance and preventive maintenance are two different things. Pilots may not perform maintenance without an A&P license, they may however, perform the preventive maintenance as specified above.